7 minutes
Introduction to docker(-compose)
What is Docker?
Docker is software that allows other programs and OS’es to run inside a container. There are other virtualization programs that can do the same (VMWare, VirtualBox, QEMU, etc.), but Docker allows building a container using a script. This script is called a Dockerfile. In addition to this, the package docker-compose allows running multiple dockerfiles at once. This way, multiple containers can run simultaneously and work together to get a certain task done. So, Docker takes much of the pain away when configuring a system, since all system configurations are stored inside the Dockerfiles. This post is going to explain the basics of making a Dockerfile and how docker-compose can manage multiple containers.
Creating a Dockerfile
A Dockerfile is a configuration script for any given container. The Dockerfile contains all the commands needed to configure an entire container (virtual machine). This chapter explains how a Dockerfile is made. All commands one would normally insert into a system are now stored in a Dockerfile.
The syntax
Dockerfiles have the following syntax (where everything including and between the < and > is to be replaced):
# this is a comment
FROM <existing container>      # use someone else's already existing container to get started more quickly

RUN <command>                  # run a command inside the container (configure phase)

# when the container starts, run the following command, where the two dashes (--) allow arguments from the host
ENTRYPOINT ["</path/to/binary>", <optional argument 1>, --, <optional argument 3>, ...]

# when the container starts, run the following command (in case no arguments were given, this is the default)
CMD ["</path/to/binary>", <optional argument 1>, <optional argument 2>]
A real world example
In real life, a Dockerfile contains many more calls to RUN before the container is configured. In the example below, a gitea server is created within a Dockerfile:
# use alpine linux
FROM alpine:latest

# install gitea
RUN apk update
RUN apk add gitea

# run gitea
CMD /usr/bin/gitea

# expose port 3000 to the host
EXPOSE 3000
Before this Dockerfile is used to create a container, another file called docker-compose.yml is created to manage all containers.
Creating a docker-compose configuration
The syntax
A configuration for docker-compose is to be called docker-compose.yml and it has the following syntax:
version: '3'
services:
  # a container which is built using a dockerfile
  a_service:
    build: <directory where the Dockerfile is located>
    container_name: <container name goes here>
    volumes:
      - "<path/to/host/dir>:<path/to/guest/dir>"
    ports:
      - "<host port>:<guest port>"
  # create another service; uses a pre-built image from Docker Hub
  another_service:
    image: <image name from Docker Hub goes here>
    container_name: <container name goes here>
    volumes:
      - "<path/to/host/dir>:<path/to/guest/dir>"
    ports:
      - "<host port>:<guest port>"
    environment:
      - variable=value
A real world example
First, the minimal configuration is created to create a gitea server:
version: '3'
services:
  gitea:
    build: ./  # The Dockerfile is located in the same directory as this file
    container_name: gitea
    volumes:
      - "$PWD/gitea_files/var/lib/gitea:/var/lib/gitea"
      - "$PWD/gitea_files/etc/gitea:/etc/gitea"
    ports:
      - "3000:3000"
The version entry is often set to 3 or 3.x. If the given version is too old, docker-compose will start complaining. This docker-compose.yml file contains one service called gitea, with container name gitea.
Volumes are a mapped directory from guest to host, where /var/lib/gitea and /etc/gitea are folders inside the container. These two folders are mapped to $PWD/gitea_files/var/lib/gitea and $PWD/gitea_files/etc/gitea respectively. After the container has run at least one time, the container files can be viewed from the host OS by entering the gitea_files folder.
Normally, when no volumes are created, each container forgets what it was doing when it stops running. This is not very desireable. When there is a power outage for example, each container would have to be re-configured. When volumes are present in docker-compose.yml, Docker will automatically restore all files in the volumes based on the files from the host OS. This would mean that the gitea server will restore the files for /var/lib/gitea (where the git repositories are located) as well as /etc/gitea (where the configuration files are stored). All the other files in the container (like the binaries in /usr/bin) do not have to be restored, and thus do not need a volume.
Starting the container
To start the docker container, the following command is executed:
# build and start all containers
docker-compose up --build
The gitea Docker container will now be built and run. The build process will only happen once. Next time the container is run, it will start without having to be built. The --build option can therefore be left out if a container is already built.
Testing the container
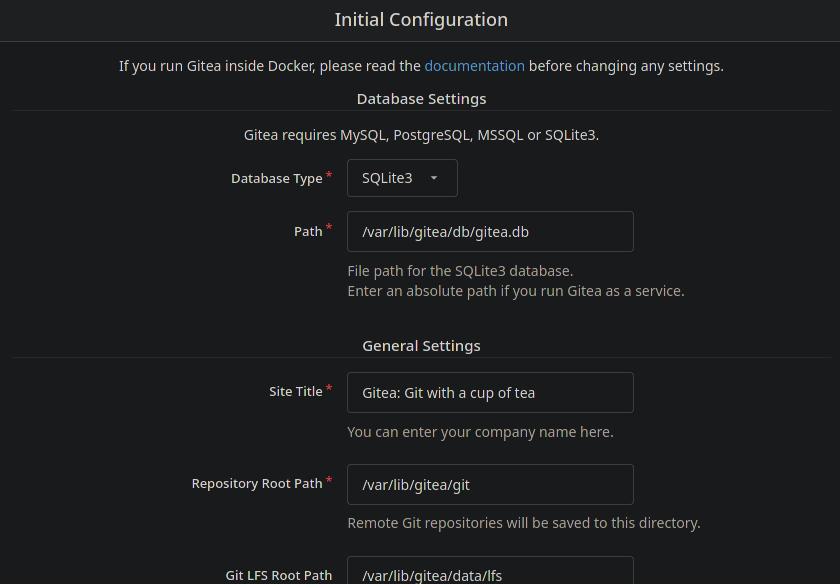
If a browser is now opened and the url http://localhost:3000 is visited, the gitea setup screen will appear. This means that the container is running as expected. An image of part of the setup screen is shown below:
Adding another container
By default, gitea is set to use a SQLite3 SQL server. This SQL server is very lightweight, but can only handle one connection at a time. This would mean that gitea would stop working if multiple users started using it. This is not very desireable.
For this reason, another container will be created in the docker-compose.yml. This container will contain a complete MySQL server. The docker-compose.yml file will now look as follows:
version: '3'
services:
  # build gitea using a Dockerfile
  gitea:
    build: ./
    container_name: gitea
    volumes:
      - "$PWD/gitea_files/var/lib/gitea:/var/lib/gitea"
      - "$PWD/gitea_files/etc/gitea:/etc/gitea"
    ports:
      - "3000:3000"

  # add another container, containing a mysql image from docker hub
  db:
    image: mariadb
    container_name: mariadb
    volumes:
      - "$PWD/mariadb_files/var/lib/mysql:/var/lib/mysql"
    environment:
      MYSQL_ROOT_PASSWORD: example_root_password
      MYSQL_USER: example_user
      MYSQL_PASSWORD: example_password
      MYSQL_DATABASE: example_database
A docker container containing a mariadb database server is now added to the list of containers. Another volume is created to make sure that all database related files are transferable to another computer at a later time.
When the containers are now (re) started using the command
# build and start all containers
docker-compose up --build
the gitea container as well as a mariadb server is started.
Communication between containers
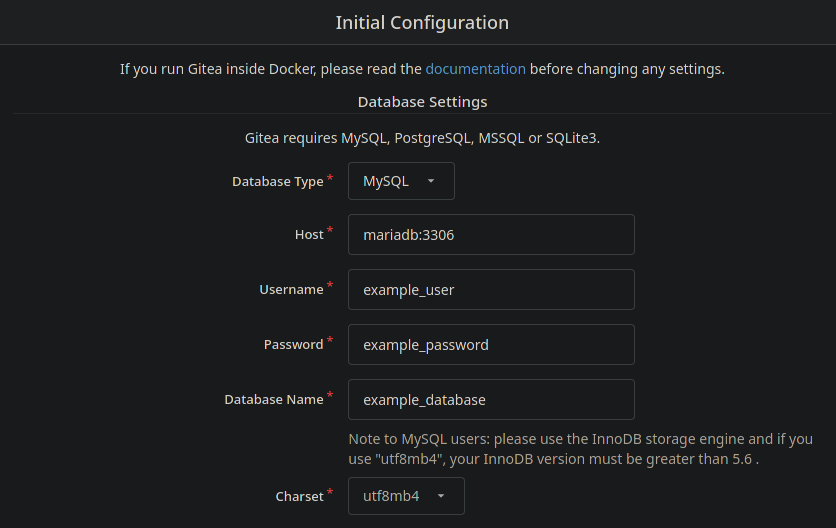
The cool thing about Docker containers is that they can talk to each other in a very nice way. How this works can be seen when configuring gitea. Normally, the IP address and port have to be inserted. Because the mariadb server is also a Docker container, gitea can be configured to talk to mariadb:3306. Docker will then automatically translate the mariadb part to the IP address of the mariadb container. This way, the two containers can always talk to each other. The database configuration for gitea now looks as follows:
Gitea will always know where the database is, since Docker will always provide the right IP address (also when the docker containers are restarted later). In addition to that, both the gitea and database container will always run together.
Because the Dockerfile for the gitea server is so minimal, the option Run as user is changed from gitea to root, since the gitea user does not exist within the container (programs should run as a non-root user within a docker container if it’s a production server!).
After all configurations are saved, the gitea server is operational and can be used to store projects.
Docker images
For most containers on Docker Hub, the needed docker-compose configuration is given. For some images however, only a command to start a container is given. An example of this is an unofficial nginx and php image. At the time of writing, the description contains the following command to start the container:
docker run -d -p 4488:80 --name=testapp -v $PWD:/var/www creativitykills/nginx-php-server
The options can be “converted” into a service and added to docker-compose.yml as follows:
version: '3'
services:
  nginx_php:
    image: creativitykills/nginx-php-server
    container_name: testapp
    volumes:
      - "$PWD:/var/www"
    ports:
      - "4488:80"
The docker image can now be managed by docker-compose and works exactly the same as it would without docker-compose.
More options
There are more options to Dockerfiles and docker-compose configurations. One example is setting up an nfs server container, where the container has (to have) access to some parts of the host OS. For most of these images, the needed configurations/options are given.
Migrating to another computer
Migrating to another computer is really simple: just copy the Dockerfile, docker-compose.yml and volume-directories to another computer. That’s it! No need to configure a new OS. Just install Docker, copy the files, rebuild the container(s) and it’s all done.
Conclusion
Docker is not too difficult to learn and is a great way to containerize many applications. Once a simple docker container is created using a Dockerfile and a docker-compose.yml file, many more features can be added. If there are containers that need to talk to eachother, it’s all possible! And migrating the whole setup to another computer is just copying files, instead of re-configuring an entire OS.

